A boat battery switch is a vital component in any marine electrical system, allowing boat owners to control the connection between the battery and onboard circuits. It provides power isolation, battery selection, and safety during maintenance or emergencies. Whether you’re wiring a single battery or managing dual battery banks, proper installation of the battery switch ensures reliable and efficient energy distribution on your vessel.
What Is a Boat Battery Switch?
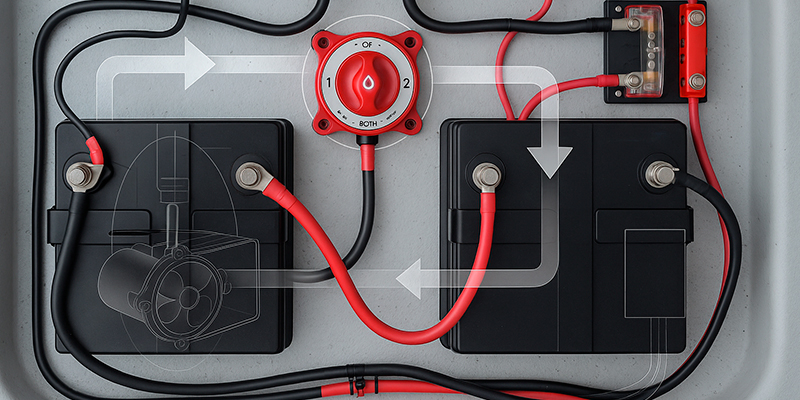
A marine battery switch is a rotary switch typically mounted near the batteries. It allows you to select between Battery 1, Battery 2, both (1+2), or completely disconnect (OFF) the batteries from the electrical system. This is particularly useful for conserving battery life, starting the engine, or powering auxiliary loads independently.
Types of Boat Battery Switches
- Single On/Off switch: Ideal for single battery systems.
- 1-2-Both-Off switch: For dual battery setups.
- Dual circuit plus switch: Separates engine and house circuits but allows emergency combining.
- Automatic charging relay (ACR): Often paired with switches to automate battery charging.
Tools and Parts Needed
- Marine-grade battery switch (e.g. Blue Sea Systems)
- Marine battery cable (tinned copper, sized per amperage and distance)
- Marine crimp connectors or lugs
- Heat shrink tubing
- Cable ties
- Marine battery terminals
- Screwdrivers, crimping tool, and socket wrench
How to Wire a Boat Battery Switch (Dual Battery System Example)
1. Safety First
Disconnect both batteries and ensure the ignition is off. Remove any shore power or solar input. Always wear gloves and eye protection when working with marine battery cables.
2. Mount the Battery Switch
Choose a dry, accessible location near the batteries. Use stainless steel fasteners and a backing plate if needed to reinforce mounting.
3. Connect Battery 1
Use marine-grade cable to connect the positive terminal of Battery 1 to Terminal 1 (labeled «1» or «Battery 1») on the switch. Secure the connection with a lug, tighten firmly, and cover with heat shrink tubing.
4. Connect Battery 2
Connect the positive terminal of Battery 2 to Terminal 2 on the switch. Again, use correct wire gauge and secure the connection properly.
5. Connect Common Output
From the «Common» or «Output» terminal of the switch, run a cable to the main distribution panel, starter solenoid, or engine circuit. This is the power feed that energizes your electrical system when a battery is selected.
6. Negative Grounding
Connect both battery negative terminals to a common bus bar or directly to the engine block using properly sized marine battery cables. This completes the circuit and avoids ground loop issues.
7. Optional: Add an ACR or Battery Combiner
For automatic charging and battery management, install a marine-grade automatic charging relay between the two positive terminals. This will allow the engine alternator to charge both batteries without manual switching.
8. Test the System
With everything secured and insulated, reconnect the batteries. Turn the switch to each position (1, 2, Both, Off) and verify voltage and function using a multimeter or onboard voltage monitor. Ensure no heat builds up and that all connections are tight and corrosion-free.
Marine Wiring Tips
- Use only marine-rated tinned copper wire for all connections.
- Ensure all battery lugs are crimped with a proper marine crimping tool.
- Use dielectric grease on terminals to prevent corrosion.
- Secure cables with insulated clamps to prevent chafing or vibration damage.
Conclusion
Wiring a boat battery switch is a fundamental task that significantly improves your vessel’s safety, efficiency, and battery management. Whether you’re installing a simple On/Off switch or setting up a dual-bank system with automatic charging capabilities, following best practices in marine wiring ensures long-lasting performance. For boat owners looking to upgrade their electrical system, selecting the right marine battery switch, marine battery cables, and connectors is essential for a reliable power setup.
For quality components, refer to certified marine electrical suppliers offering products compliant with ABYC standards for safe and durable installations.