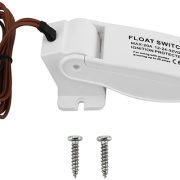
A bilge pump float switch is an essential component of any boat’s bilge system, designed to automatically activate the bilge pump when water levels rise to a certain point. Properly wiring a bilge pump float switch is crucial for maintaining the safety and functionality of your vessel. This guide will take you through the steps to wire a bilge pump float switch correctly, ensuring your boat remains dry and secure.
When wiring a bilge pump with a float switch, it’s important to understand how to connect both a manual switch and automatic bilge pump. For proper installation, a 3-way switch or rocker switch is often used, allowing the bilge pump to function manually or automatically. The brown wire typically powers the pump, while the negative feed wire connects to the battery. In this guide, we focus on wiring a separate float switch or a built-in float switch, showing how to wire the system so that the pump activates when the bilge water reaches a certain level, ensuring the bilge pump installation works efficiently to keep your boat safe.
Understanding the Components
Before diving into the wiring process, it’s important to familiarize yourself with the key components involved:
- Bilge Pump: The device that pumps water out of the bilge area.
- Float Switch: A switch that senses rising water levels and automatically turns on the bilge pump.
- Power Source: Typically a 12V battery used on most boats.
- Fuse: A protective component that prevents overcurrent, safeguarding the electrical system.
When installing a bilge pump with a manual or automatic switch, proper wiring is essential to ensure the pump is running efficiently. Using a 3 way switch or a bilge float switch with a manual bilge pump allows you to control the system from a switch panel. The wiring installation of the 12V bilge pump involves connecting the pump brown wire and negative wire to the power source and fuse, ensuring safe operation. In the wiring diagram, you’ll see how to connect the pump to the battery switch and position the float switch so the bilge pump automatically activates when the bilge water level rises. For a successful bilge pump installation, make sure the bilge pump housing is secure, and the wires are properly connected, preventing the pump from running unnecessarily.
Tools and Materials You’ll Need
- Marine-grade wire (12 or 14 gauge, depending on the pump specifications)
- Float switch
- Bilge pump
- Wire strippers and crimpers
- Butt connectors or waterproof connectors
- Fuse holder and appropriate fuse (typically 5A-15A, depending on your pump)
- Heat shrink tubing or electrical tape
- Zip ties or cable clamps
In the wiring installation process, it’s crucial to ensure the bilge pump switch is properly connected to the 12V bilge pump, as these are key elements for reliable operation. When wiring a manual electric bilge pump, the bilge switch and float switch must work together to allow the bilge pump to automatically activate when the boat bilge fills with water. Properly connecting the wires from the bilge float ensures the system functions smoothly. During installation, ensure the negative feed wire is connected to the correct terminals and that the voltage of the bilge pumps matches your boat’s electrical system. For additional safety, install a separate switch to manually operate the pump if needed.
Step 1: Prepare the Installation Area
Before starting, ensure the bilge area is clean and dry. This is where both the bilge pump and the float switch will be installed. Place the bilge pump at the lowest point in the bilge, where water typically collects. The float switch should be positioned next to the pump but not too close to interfere with its operation. Ensure the float switch has enough room to move freely with the water level.
Step 2: Wiring the Float Switch to the Bilge Pump
The typical float switch has two wires:
1. One wire connects to the positive (+) wire of the bilge pump.
2. The other wire connects to the positive (+) lead from the battery.
Here’s how to wire them:
- Strip the Wires: Cut and strip the positive wire from the bilge pump to the appropriate length, allowing it to reach the float switch comfortably. Strip about 1/2 inch of insulation from the ends of the wires.
- Connect to the Float Switch: Use a butt connector or a waterproof connector to attach the positive wire from the bilge pump to one of the wires from the float switch. Ensure the connection is secure and properly insulated.
- Connect to the Power Source: The remaining wire from the float switch will connect to the positive lead that runs to the battery. This connection should also be made using a butt connector, with the wire secured and insulated.
Step 3: Install the Fuse and Complete the Power Connections
- Install the Fuse Holder: On the positive wire running to the battery, install a fuse holder. This is essential for protecting your bilge pump system from potential electrical overloads. Make sure to choose a fuse with the correct amperage rating for your pump.
- Connect to the Battery: Connect the positive wire from the float switch (now with the fuse installed) to the positive terminal of the battery. The negative wire from the bilge pump should be connected directly to the battery’s negative terminal.
- Secure the Wiring: Use heat shrink tubing or electrical tape to seal all connections, ensuring they are waterproof. Secure the wires using zip ties or cable clamps to keep them in place and prevent them from rubbing against surfaces or getting tangled in moving parts.
Step 4: Testing the System
Before finalizing the installation, it’s important to test the system to ensure everything is working correctly:
- Fill the Bilge with Water: Add water to the bilge until the float switch activates. The bilge pump should turn on automatically and begin pumping water out of the bilge.
- Manual Operation Test: If your bilge pump has a manual override switch, test this function to ensure that the pump can also be operated manually.
- Monitor for Proper Shutdown: Once the water level drops and the float switch deactivates, the bilge pump should stop automatically.
- Use a Multimeter: If available, use a multimeter to check the voltage at various points in the system to confirm proper wiring and connectivity.
Step 5: Finalizing the Installation
After verifying that everything is functioning correctly, secure all wiring and components in place. Double-check that all connections are waterproof and that the wiring is routed safely, away from any moving parts or sharp edges that could cause wear over time.
Maintenance Tips
- Regular Inspections: Periodically check the wiring and connections for signs of wear, corrosion, or damage, and repair them as necessary.
- System Testing: Regularly test the bilge pump and float switch, especially before long trips, to ensure they are working properly.
- Keep the Bilge Clean: A clean bilge area helps prevent debris from interfering with the float switch and the pump’s operation.
How to Wire a Bilge Pump Float Switch : Conclusion
Wiring a bilge pump float switch is a straightforward process, but attention to detail is crucial for ensuring reliable operation. By following these steps, you can wire your bilge pump float switch correctly, providing automatic protection against water accumulation in your boat’s bilge. Proper installation and regular maintenance will keep your bilge system functioning efficiently, giving you peace of mind whether you’re at dock or out on the water.
In addition to proper wiring, it’s important to regularly check the system for any signs of wear or malfunction. Ensuring the float switch and bilge pump are in good condition, and the wiring is secure, will help prevent any issues while you’re on the water. Routine maintenance, including inspecting the connections, checking for corrosion, and testing the automatic activation of the bilge pump, will extend the life of your bilge system and enhance its reliability. Keeping up with these tasks ensures that your bilge pump float switch continues to operate smoothly, safeguarding your boat against unexpected water accumulation.


