Wiring a 24V trolling motor properly is essential for safety, performance, and longevity of both the motor and battery system. A 24V setup provides more thrust than a 12V motor and is typically used on larger boats. Below is a clear step-by-step guide using common marine electrical components and best practices.
What You’ll Need:
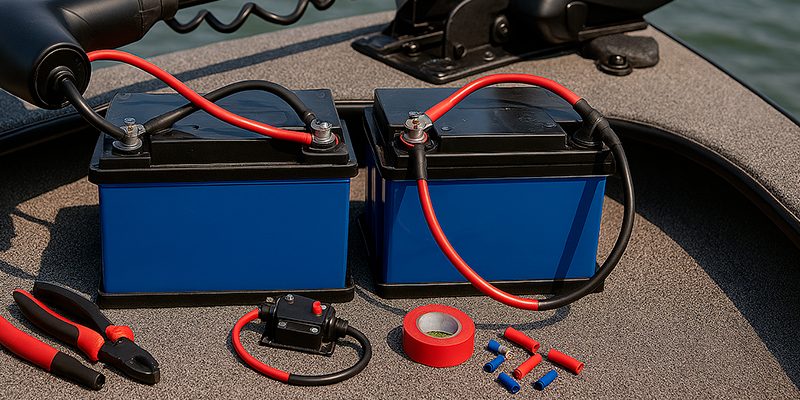
- Two 12V deep-cycle marine batteries
- Appropriate gauge marine-grade wire (typically 6 or 8 AWG, depending on the length of the run)
- 60-amp circuit breaker (marine-rated)
- Inline fuse (optional but recommended for added protection)
- Battery connectors or terminal rings
- Trolling motor plug (optional, for quick disconnection)
- Heat shrink tubing and cable ties
- Battery boxes (recommended for safety and organization)
Wiring Steps:
1. Position Your Batteries
Place the two 12V batteries in your boat near the trolling motor or in a balanced, dry location. Make sure both batteries are fully charged and in good condition.
2. Connect Batteries in Series
To achieve 24 volts, wire the batteries in series:
- Connect the positive terminal of Battery 1 to the negative terminal of Battery 2 using a jumper wire.
- This jumper is what creates a 24V system (12V + 12V = 24V).
3. Connect Power to the Motor
- Connect the positive lead from your trolling motor to the positive terminal of Battery 2.
- Connect the negative lead from your trolling motor to the negative terminal of Battery 1.
- Insert a 60-amp circuit breaker on the positive lead between the battery and trolling motor for protection.
4. Use Proper Marine Hardware
Use tinned copper marine-grade wire and waterproof connectors to prevent corrosion. Secure the wiring with cable ties and route it away from areas with heavy vibration or moisture exposure.
5. Double-Check Your Setup
Before powering on, check all connections for tightness, correct polarity, and protection. Make sure there is no exposed copper wire and that heat shrink tubing is applied properly.
6. Test the Motor
Turn on the trolling motor and verify that it powers up at all speeds. If it doesn’t, recheck the series connection and breaker.
Additional Tips:
- Label wires for easy maintenance later.
- Install a trolling motor plug system if you plan to remove the motor frequently.
- Regularly check battery voltage and clean terminals.
Wiring a 24V trolling motor is straightforward if you follow these steps carefully. Always refer to your trolling motor’s manual for wire size recommendations and installation guidance specific to your model. Proper wiring ensures smooth operation and safer boating.